
As I conduct virtual meetings and demos, I’ve observed numerous users log into their dashboard. Some stick with the traditional way of logging in, typing their username and password. Others just use their mouse, letting their password manager do the rest.
Wouldn’t it be safer if you added another layer of security to the way you login? By enabling Two Factor Authentication (2FA) in your dashboard, you’ll increase your security and decrease the probability of hackers gaining account access.
I don’t blame you if you haven’t enabled 2FA yet. It took me a while to enable this security protocol due to a couple of reasons. Hmmm, let me think. Simply put, I’m lazy and don’t want to pull out my phone to generate a code to log in! It’s tedious. But you know what? It’s a terrible excuse. Like the old saying goes “Better safe than sorry.”
So, here’s a quick guide to enable 2FA within your RMM account.
Global – General Settings
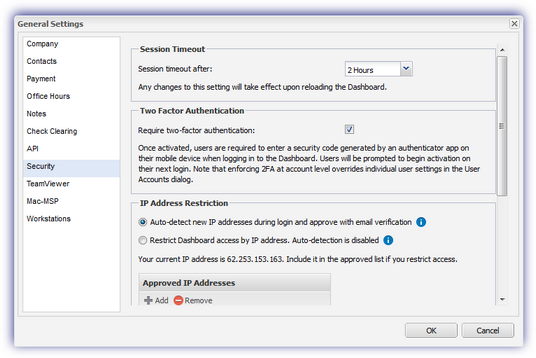
To enable Two-Factor Authentication for all dashboard users:
- Go to Settings > General Settings > Security
- Tick the Require Two-Factor Authentication box to enable.
- OK to save changes and apply.
Once 2FA is enabled, all users are prompted to begin the activation process on their next login.
Individual or Specific Users – User Account Dialogue
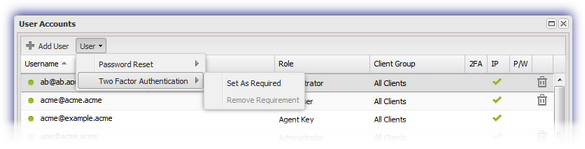
For situations where it may not be practical to enable 2FA for all dashboard users, 2FA may be enabled for individual users:
- Go to Settings > Users > User Accounts
- Multi-select the target users (Shift and left-click to choose a range of users or Control and left-click for specific users).
- From the Users drop-down (or right-click context menu).
- Choose Two Factor Authentication and Set As Required to enable.
- Click OK, then enter the account password you logged into the dashboard under, to confirm.
The user is prompted to begin the activation process on their next login.
Important: please be aware that where 2FA is enabled for all dashboard users, the option to enabled or disable individual users is unavailable.
Navigator Bar
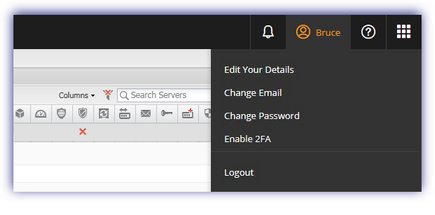
When in the dashboard, the option to enable 2FA is available from the user menu in the top navigator bar.
- Click on your name.
- Choose Enable 2FA.
- The user starts the 2FA activation process.
Please note, the 2FA management options are only available when logged on to the dashboard using an account with enhanced privileges. Go to Settings > Users > Roles and Permissions to set and update feature access settings for users based on their role.
With the rise in cybercrime awareness and multiple reports of system hacks, you’d think more people would be putting an additional layer of security protocols. Passwords can be compromised and abused. So why not take the time to set up an extra layer? Secure your account and if you still have any excuses, I’d like to hear them. Ha-ha.
Shoot me an email at keenan@sofsol.co.nz, and tell me your excuse not to switch on 2FA.